Multi-location attendance in AttendFirst: branches and sites
Manage multiple offices and branches in AttendFirst. Set per-location geofence and selfie rules, then scope holidays and leave types to each branch only.
A location in AttendFirst is one physical workplace your team checks in from. Every company starts with one called Main Office. Add more when you open a second branch, a warehouse, a retail outlet, or a regional sales office that needs its own geofence, holidays, or leave policy.
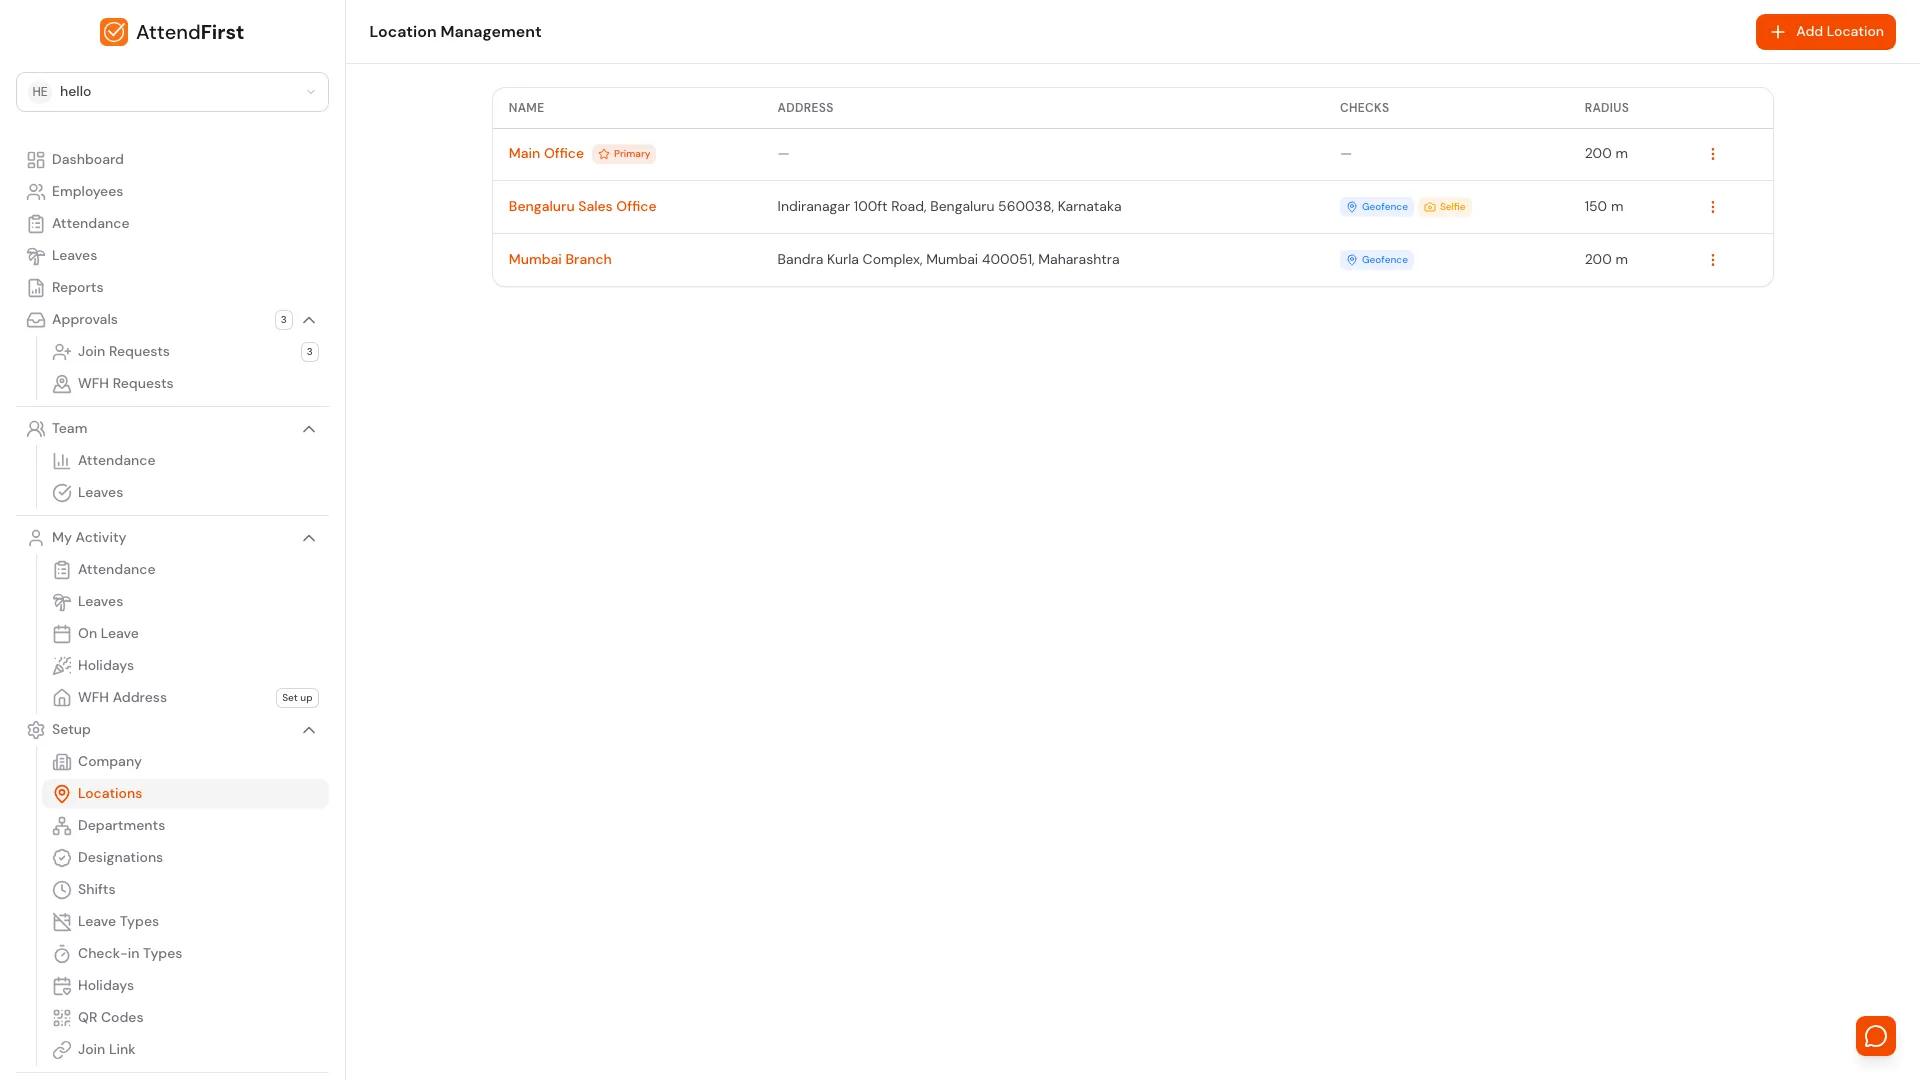
/admin/settings/locations. Every workplace your team checks in from in one list.
When to add a location
If you only have one office, you don’t need to do anything. The default Main Office covers everyone.
Add another location when:
- You open a second office in a different city with different holidays.
- A retail outlet or warehouse needs its own geofence around its address.
- A regional team observes a state festival that the head office doesn’t.
- A client site or construction site needs its own check-in record.
Adding a location
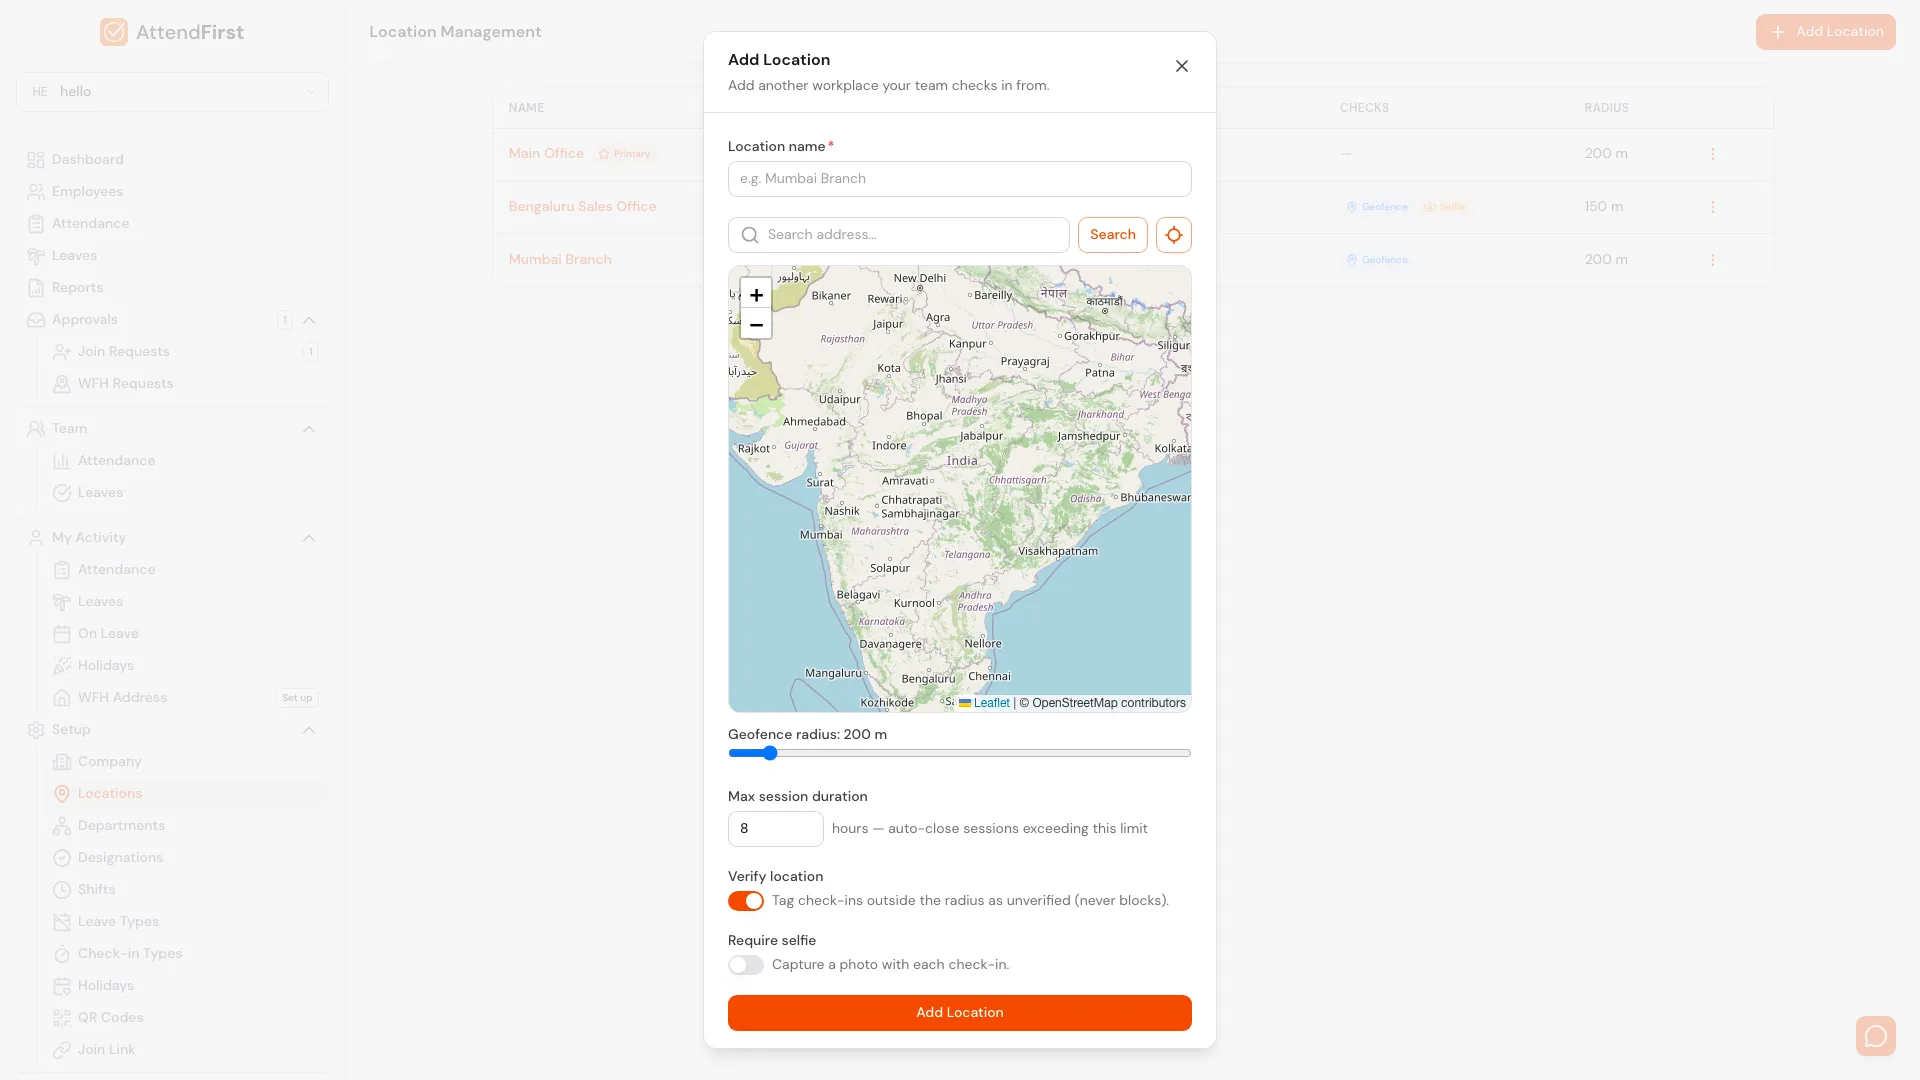
Add Location opens a modal with the map widget. Type a city or address, drag the pin, set the radius.
Open Setup → Locations and click Add Location. Fields:
| Field | What it controls |
|---|---|
| Location name | Label shown on employee profiles, device labels, and every picker that needs a location. |
| Address with map | Searchable address field with a draggable pin. The pin is the centre of the geofence circle. |
| Geofence radius | Distance in metres around the pin. Defaults to 200m. Drag the circle on the map to resize. |
| Max session duration | Auto-closes sessions running past this limit. Defaults to 8 hours so a forgotten clock-out doesn’t run forever. |
| Verify location | When on, AttendFirst tags check-ins outside the radius as Unverified. The check-in still goes through. |
| Require selfie | When on, the mobile check-in flow opens the camera and stores a photo with every session at this location. |
Click Add Location. The new branch is created and ready to receive employees, devices, holidays, and leave types.
The Primary location
Every company has exactly one Primary location, marked with a star badge. The Primary is the fallback when no location is specified:
- New employees added via Add Employee with the Location field left blank.
- New devices created via Add QR Code with no location selected.
- New self-join requests submitted through the public join link.
To switch the Primary, click the three-dot menu on any other row and pick Make primary. AttendFirst asks for confirmation, then swaps the badge. The old Primary becomes a regular location.
You cannot delete the Primary directly. If you need to remove the original Main Office, make another location Primary first, then delete the old one.
Location detail page
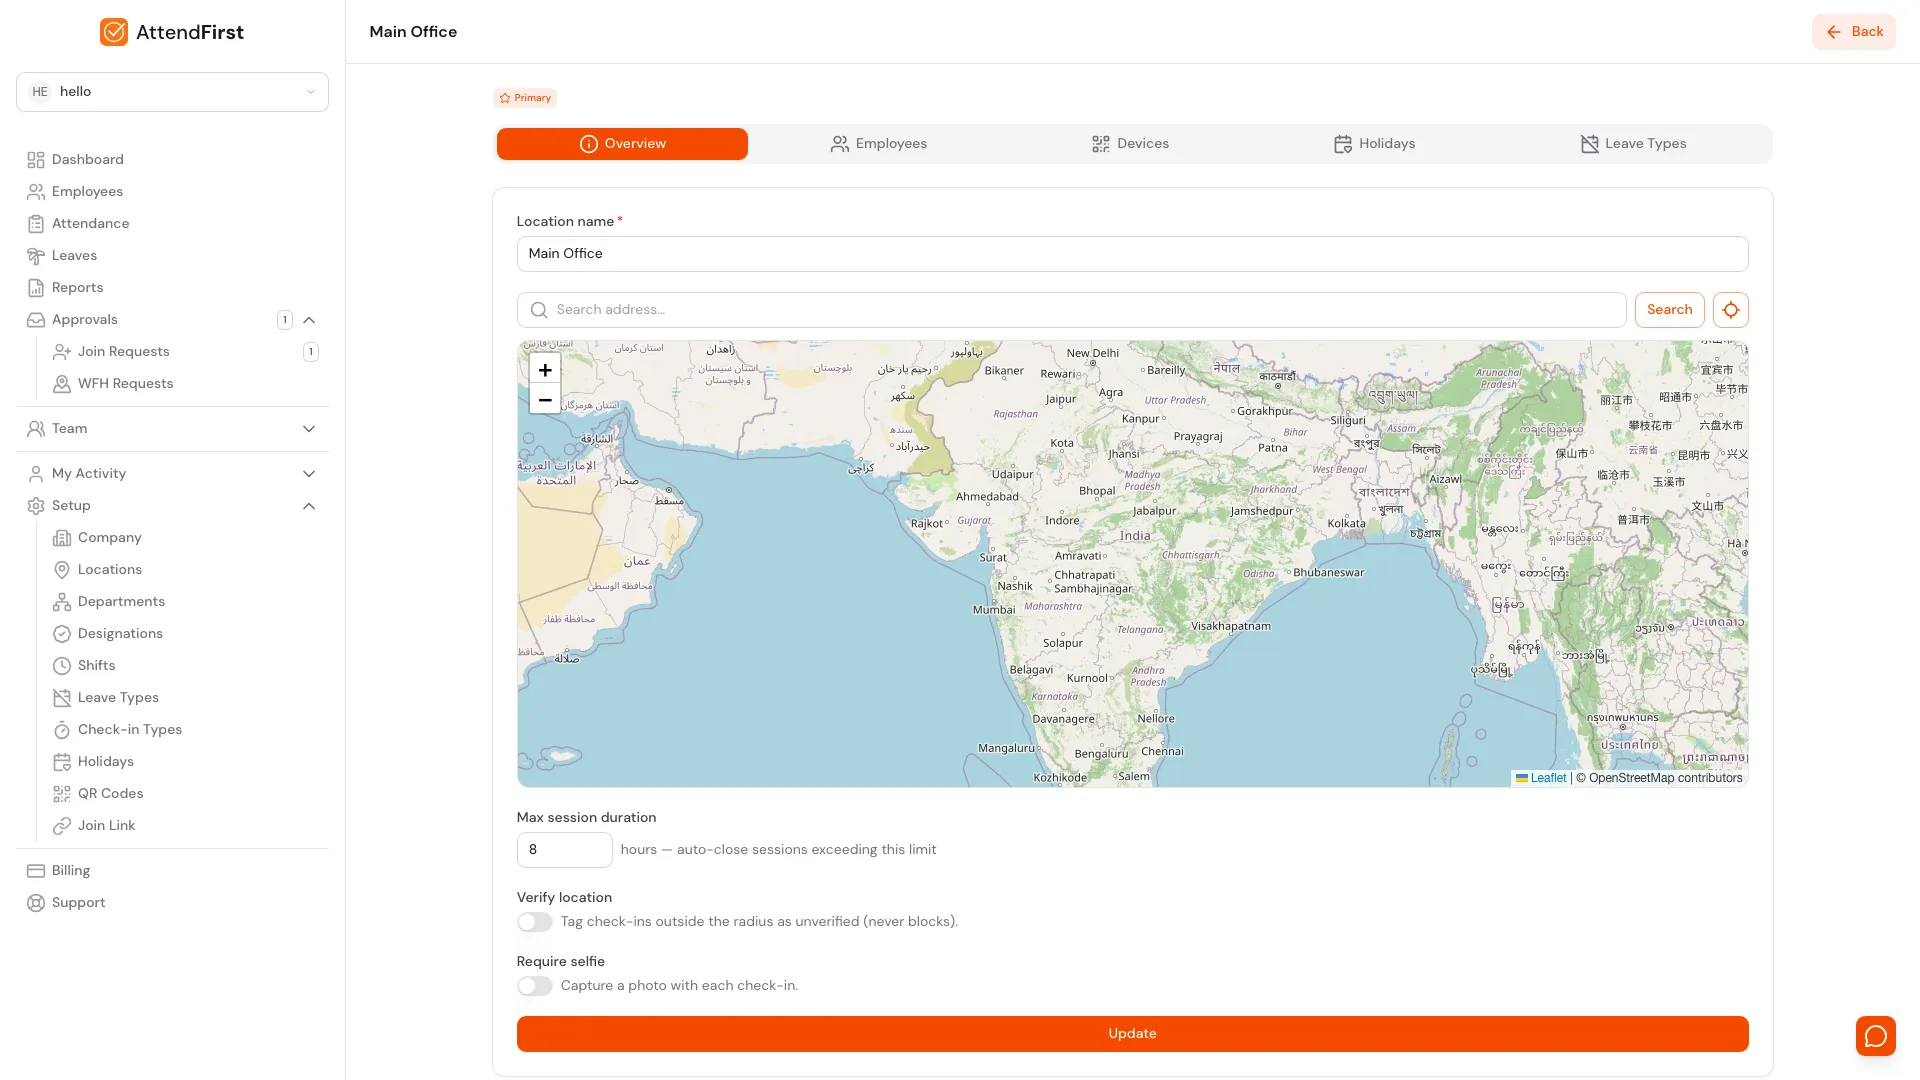
Click any location to open its detail page. Edit settings on Overview; scope data on the other tabs.
Click any row to open the detail page at /admin/settings/locations/[id]. Five tabs sit at the top:
- Overview edits name, address, geofence radius, verification rules, and session duration.
- Employees lists everyone assigned to this location.
- Devices lists every QR code or kiosk tagged to this location.
- Holidays shows holidays scoped to this location plus all Company wide ones.
- Leave Types shows leave types scoped to this location plus all Company wide ones.
The Employees, Devices, Holidays, and Leave Types tabs reuse the same forms as their global pages, except the location field is pre-filled and locked. That stops you from accidentally making an org-wide change from a per-location screen.
Employees tab
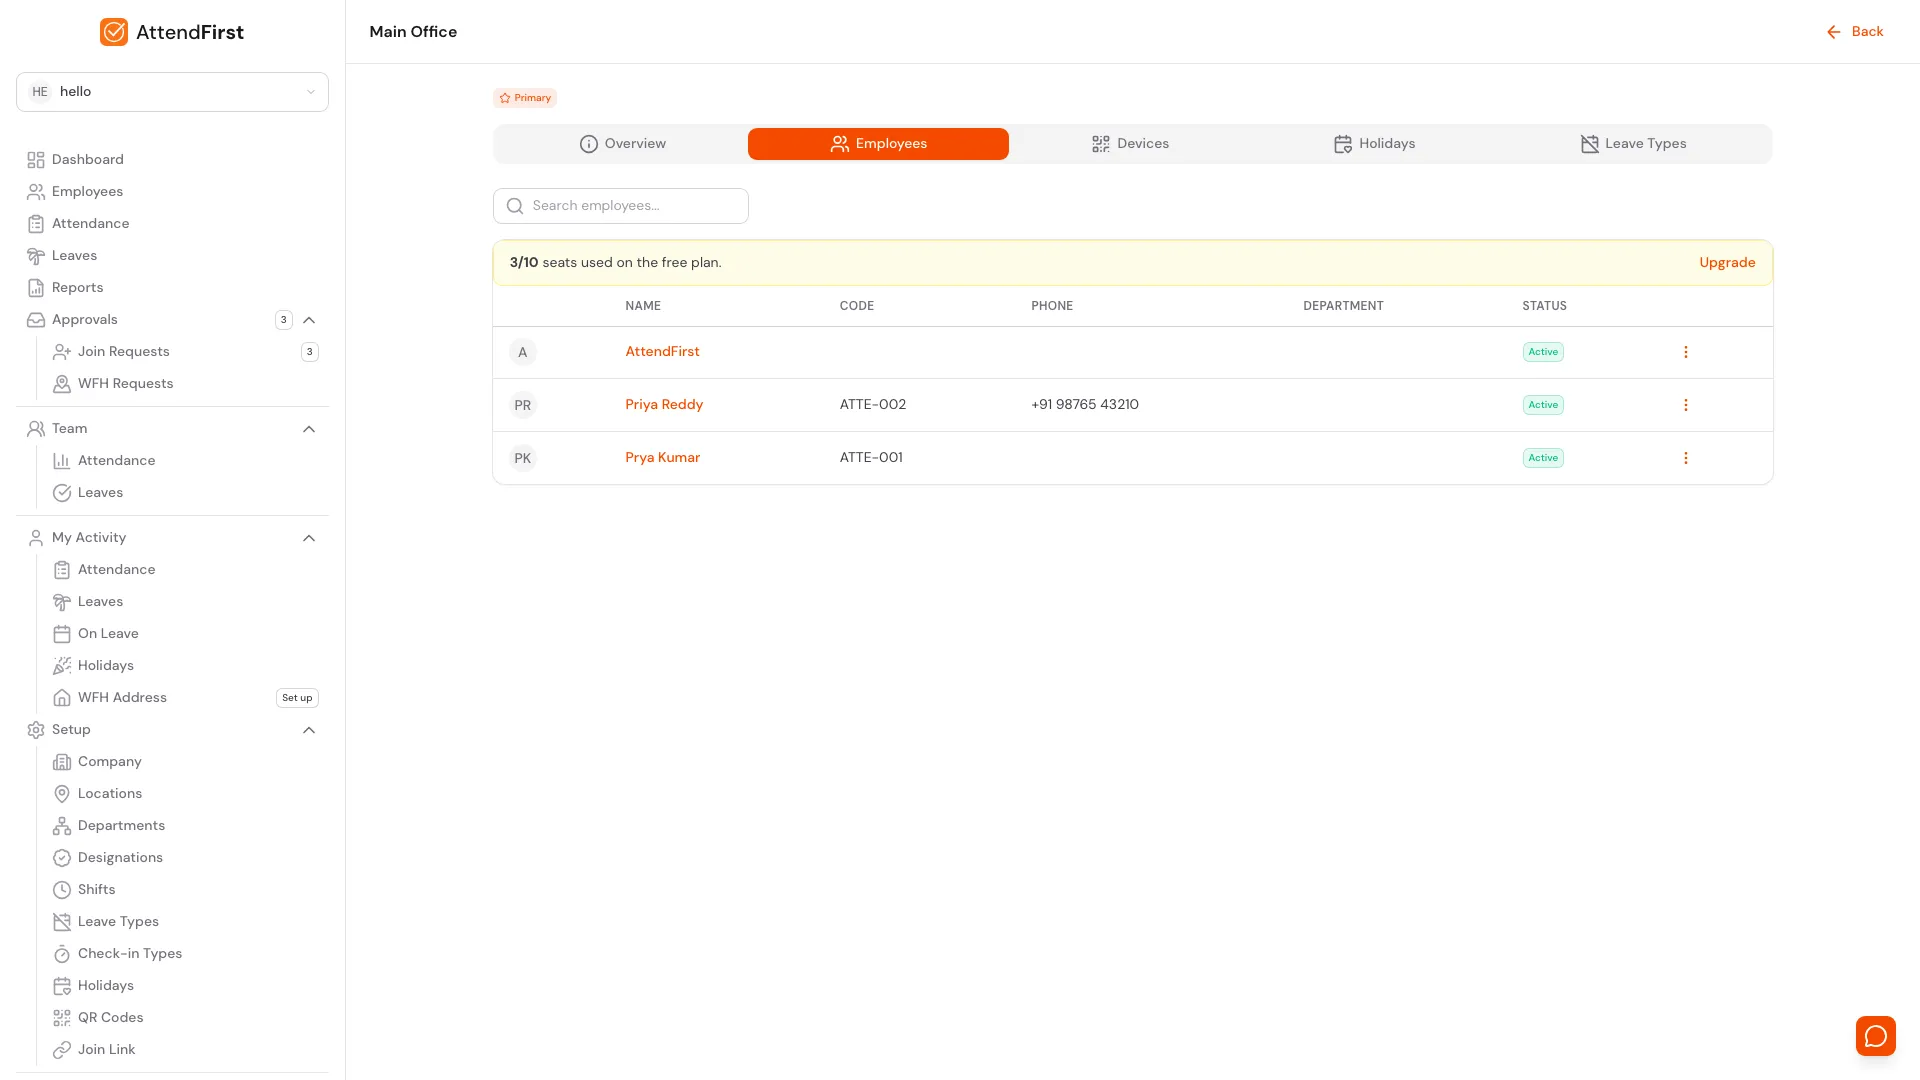
Every employee assigned to this location, with the same row actions as the global Employees list.
The Employees tab is the same list and row actions as Employees, pre-filtered to this branch. To add a new employee, use the Add Employee button on the global /admin/employees page and pick this location in the Location field.
Devices tab
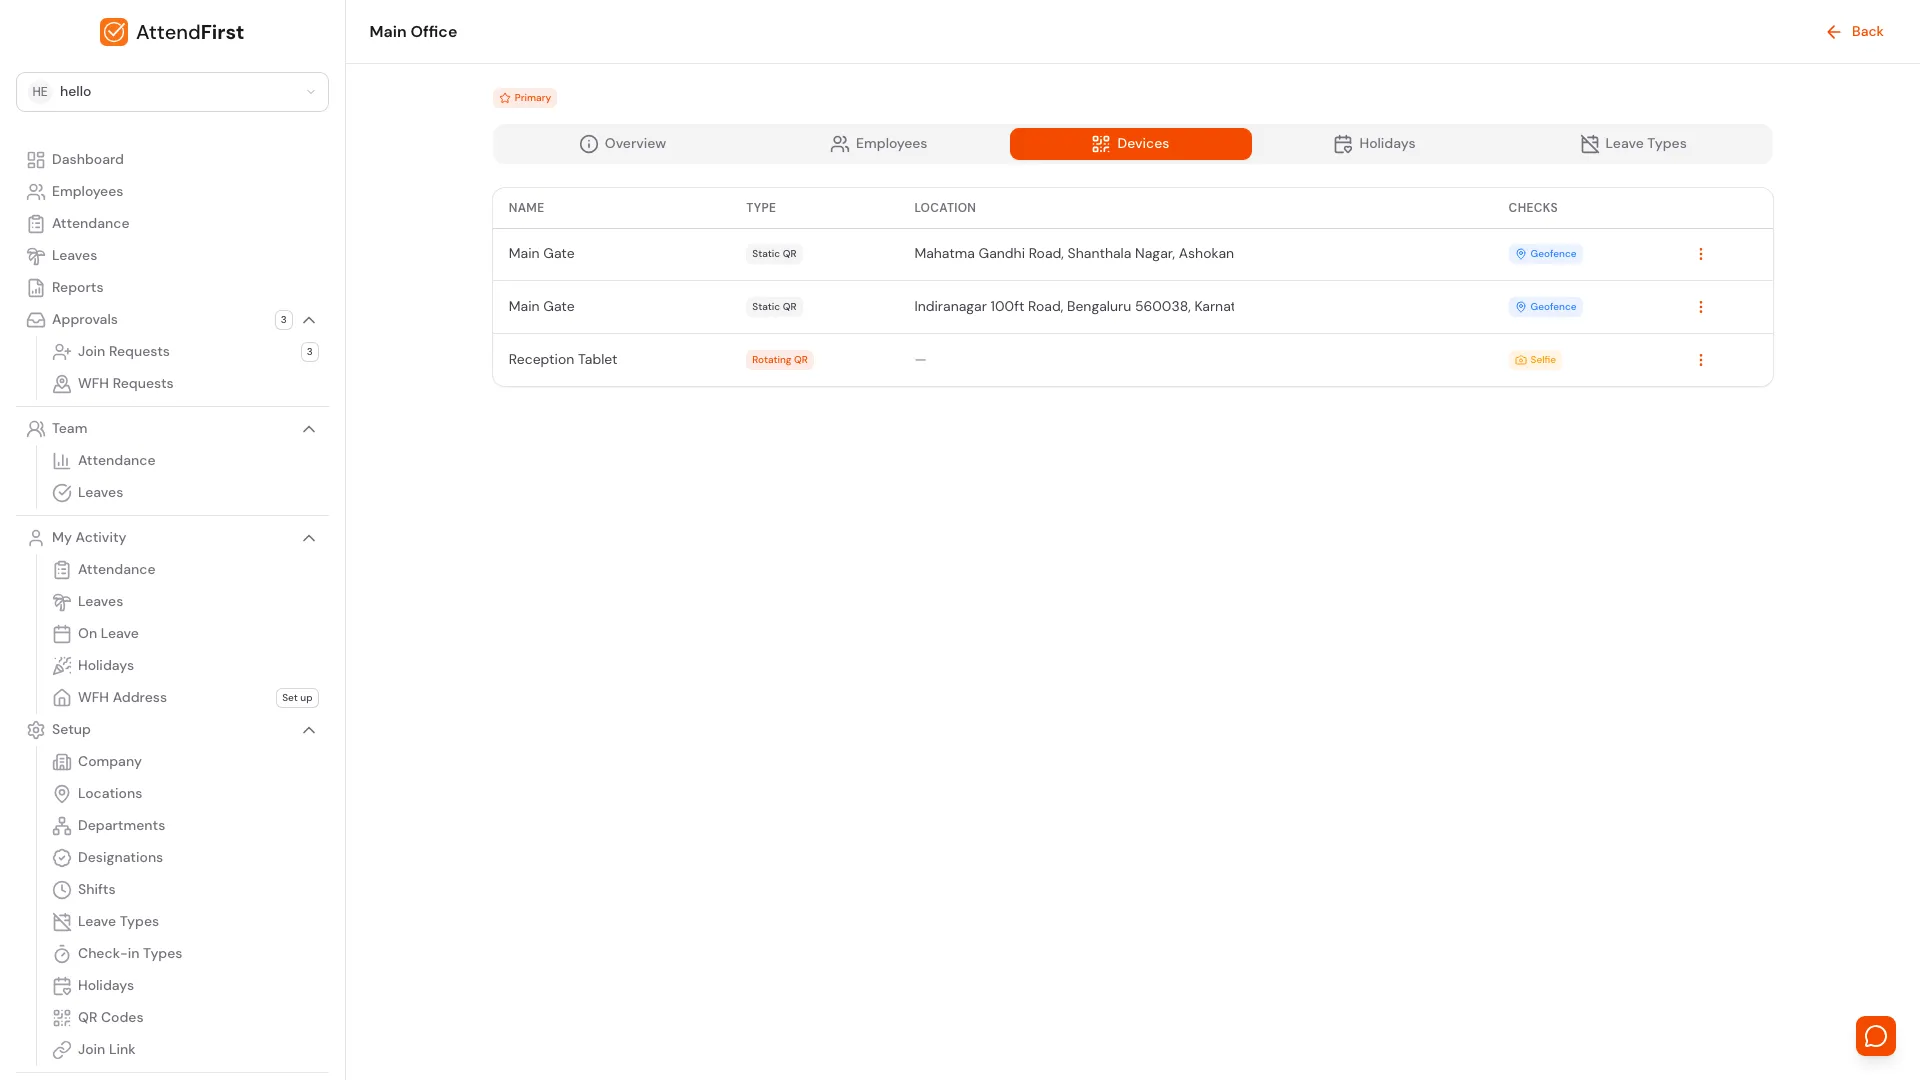
QR check-in devices tagged to this location. Add new ones from Setup → QR Codes.
The Devices tab lists every QR code or kiosk this branch uses for check-ins. A scan on one of these devices records the check-in against this location, even if the employee is normally assigned somewhere else. That keeps branch attendance audits clean. Create new devices from QR Codes and pick this location in the form.
Holidays tab
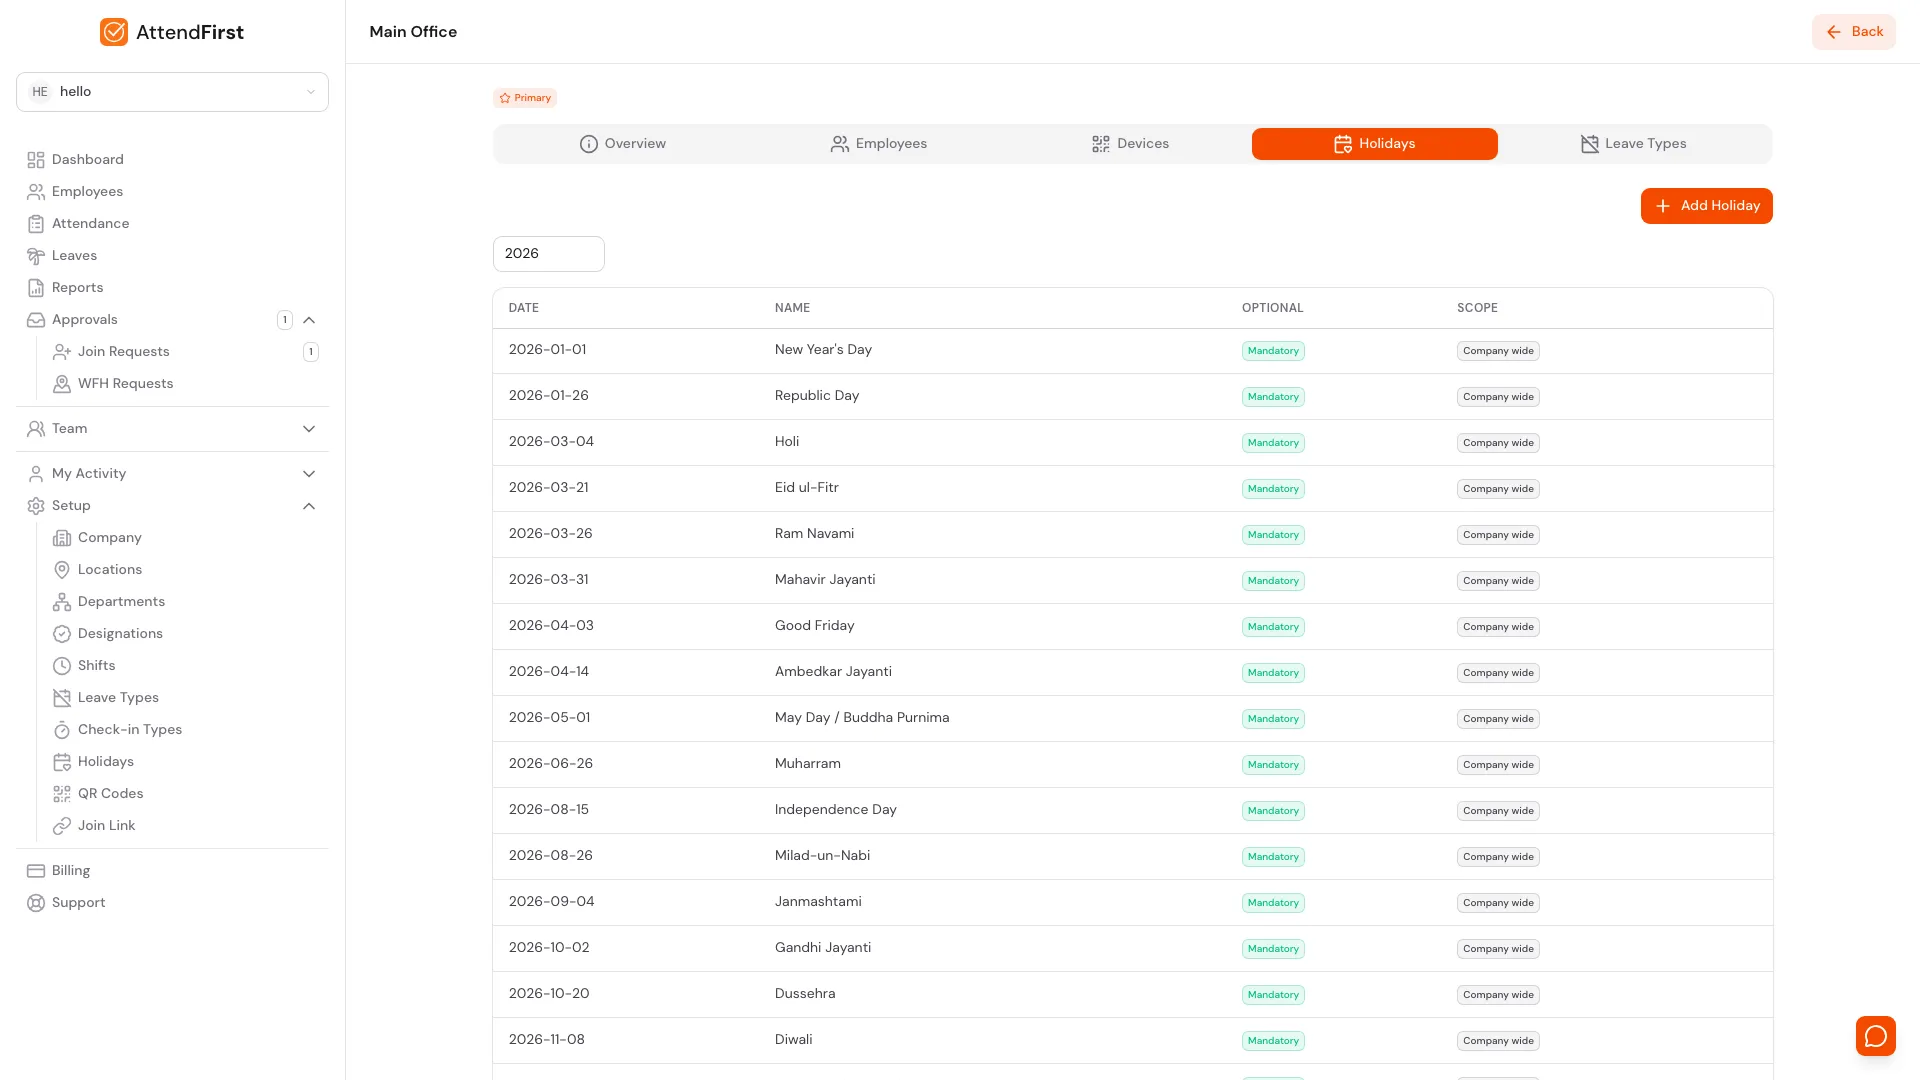
Holidays tab. Company wide holidays appear here too, so the calendar is always complete. Add Holiday creates a location-scoped entry.
The Holidays tab merges Company wide holidays with any scoped to this location. Click Add Holiday from this tab and the Applies to picker is locked to the current branch. That stops accidental org-wide changes.
Leave Types tab

Leave Types tab. Company wide types appear by default. Add Leave Type creates a location-scoped entry.
The Leave Types tab follows the same pattern. Company wide types appear by default; Add Leave Type from this tab creates a type scoped to this location only.
Scope: Company wide vs location-specific
Holidays and leave types have two scopes:
| Scope | Applies to | When to use |
|---|---|---|
| Company wide | Every employee in every location. | National holidays, default leave types like Casual / Sick / Privilege. |
| Location-specific | Only employees assigned to that branch. | Regional festivals, branch-only leave categories. |
When you click Add Holiday or Add Leave Type from the global Settings page, the form shows an Applies to picker that defaults to Company wide. Pick a specific branch to scope the entry there. When you add from inside a location’s detail page, the scope is locked to that branch.
Both lists show a Scope column. Company wide entries get a grey badge; location-scoped entries get a blue badge with the branch name. Use the scope picker above the table to filter.
How location affects employees
Every employee has one location, set on the Add Employee form and editable from their profile. That location decides three things:
- Which geofence applies when they check in.
- Which holidays appear on their calendar (Company wide plus their location’s).
- Which leave types they can apply for (Company wide plus their location’s).
Employees with Work mode: Field skip the geofence entirely. Their location is logged but never tagged Unverified.
Check-in security: Verify location and Require selfie
Each location has two security switches:
Verify location uses the geofence radius around the location’s pin.
- Check-ins inside the radius are tagged Verified.
- Check-ins outside the radius are tagged Unverified but still save successfully.
- Admins can filter Unverified check-ins in Reports for follow-up.
Require selfie captures a photo on every check-in at this location.
- The mobile check-in flow opens the camera before saving the session.
- Selfies are stored against the attendance record and visible on the admin attendance page.
- Turn it on for cash-handling counters, factory floors, or any spot where physical presence matters for compliance.
Leave both off for remote teams and field workers where GPS and selfies add friction without a clear security gain.
Editing and deleting
Click the three-dot menu on any row:
- View opens the detail page.
- Edit opens the same form as Add Location, pre-filled with current values.
- Make primary prompts for confirmation, then swaps the star badge.
- Delete is permanent. Blocked if any employees or devices still point at the location. The Primary location is never deletable; switch the Primary to another row first.
Frequently asked questions
Does adding more locations cost extra?
No. Locations are unlimited on every plan, including Free. AttendFirst bills per active employee, not per location.
Can two locations share employees?
An employee belongs to one location at a time. To move someone, edit the profile and change the Location field. Past attendance records stay tagged to the location where they were captured.
What happens if I try to delete a location with active employees?
The delete is blocked. The dialog tells you which records still point at the location so you can reassign them first. This stops orphan records.
Do reports break out attendance by location?
Yes. The CSV export from Reports includes a location column on every row. The per-employee monthly report rolls up to whichever location the employee was assigned to at the time.
Can a manager only see their own location?
Not yet. Manager visibility is currently based on direct reports, not location. Location-scoped manager views are on the roadmap.
Related docs
- Managing employees. Assign each employee to a location.
- Home locations. Verify check-ins for remote and hybrid employees who work from home.
- QR attendance. Scope QR codes to a specific location.
- Holidays. Set Company wide or location-specific holidays.
- Leave types. Define Company wide or per-location leave categories.
- Working hours and shifts. Combine with per-employee shifts for branch-specific schedules.
Steps
- Open Location Management. Go to Setup → Locations. The Primary location ships pre-created and is marked with a Primary badge.
- Click Add Location. The Add Location modal opens with Location name, address with map, geofence radius, max session duration, Verify location switch, and Require selfie switch.
- Pick the address on the map. Type an address or city into the search box and pick a result. Drag the pin to the exact spot. The radius circle on the map shows the check-in geofence.
- Set check-in rules. Turn Verify location on to tag check-ins outside the radius as Unverified (never blocks). Turn Require selfie on to capture a photo on every check-in at this location.
- Save and assign. Click Add Location. The new branch appears in the list. Assign employees and QR codes to it, and create location-scoped holidays or leave types from its detail page.
Frequently asked questions
How many locations can AttendFirst handle?
Unlimited on every plan, including Free. AttendFirst bills per active employee, not per location. Most teams add one location per office, branch, store, or site they want to track separately.
What is the Primary location for?
The Primary location is the default for new employees, new devices, and self-join sign-ups when no location is specified. Every company has exactly one Primary, marked with a star badge. Pick Make primary on any other row to switch.
Can I delete a location?
Yes, except for the Primary. The delete is blocked if any employees or devices still point at the location, so reassign them first. To delete the current Primary, make a different location Primary first.
Do holidays and leave types apply across all locations?
By default yes. Holidays and leave types created without a location are Company wide and apply to everyone. To scope one to a single branch, pick that branch in the Applies to picker on the create form, or create it from inside the location's detail page.
How do employees check into the right location?
Each employee has a location set on their profile. AttendFirst uses that location's geofence to mark check-ins as Verified or Unverified. A QR code printed for a specific location tags every scan with that location too.
Do I need geofencing at every location?
No. Verify location is set per location, so you can leave it off for remote teams or field workers where GPS verification adds friction. Turn it on where presence at a specific spot matters, like a retail counter or factory floor.
Can two locations share employees?
An employee belongs to one location at a time. To move someone, edit the profile and change the Location field. Past attendance records stay tagged to the location where they were captured.